Preferences
In addition to the Dialing Rules, Dial Methods, Address Book Menu, and Notifications, there are other preferences that you can customize to optimize JPT’s behavior to your environment.

When JPT first launches, there is a launch window that will float over all other windows. This window will track the application’s startup progress. While every effort has been made to optimize the startup time, on some systems, this can still take longer than hoped. To minimize the obtrusiveness of the launch, you can disable the option to “Use Launch Window” With this option disabled, when JPT is launched, you’ll see a spinning progress bar in the menu bar while JPT starts up.
If you would like to have JPT automatically launch whenever you login to your machine, enable the option to “Add JPT to Login Items”. For maximum unobtrusiveness, disable the option to “Show Main Window on Launch” and after JPT launches only the JPT menu will be visible so you can get to work, undistracted by the interface.
If you really hate textured windows (brushed metal), you can turn them off by disabling the “Textured Windows” option. If you prefer to have the main window open, you can reduce its opacity and remove its shadow using the appropriate controls to make the window less obtrusive.
When the main interface window is open, there is a small status box that indicates the current JPT status (such as dialing or initializing the modem). If you prefer to work without this window open, you may not know what JPT is up to at any given time. If you would like to more feedback, you can enable the option to “Use Status Window” which will display a semi-transparent floating window when JPT’s status changes (e.g., when dialing). When idle, this window will close on its own. This status window can be completely customized to suit your preferences. To change the look of the status window, click the “Settings...” button to see the status window options. (If you have the Growl notification system installed, you can use that instead of the JPT status window for notifications.)
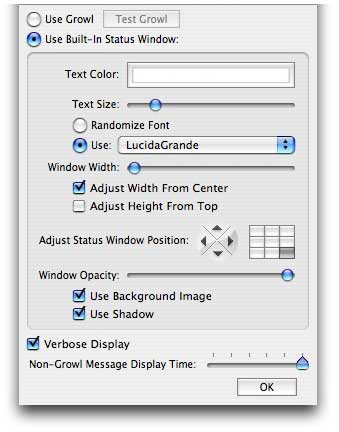
When configuring the status window, a representative status window will be displayed. You may drag this window anywhere on your screen to set its position (or use the more precise positioning arrows or matrix). If you opt not to use the background image, you must carefully click on the text of the window to be able to drag it to your desired position. In the settings window you may choose the color for the text, the font (or have JPT randomly choose a font from your installed fonts each time the status window is displayed), and many more settings to determine how the status window appears and how it operates.
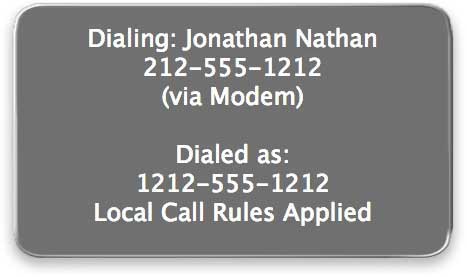
When the status window is used, it will only adjust its height to display the status message, not the width. The width is fixed from your width choice in the settings window. The maximum width is the size of your main screen. the option to “Adjust Width From Center” only applies when adjusting the width when configuring the window. The status window will automatically shrink or expand its height to fit the status message. When expanding, you can choose to “Adjust Height From Top” to keep the window fixed toward the top of your screen but if you prefer to have it fixed at the bottom of the screen and grow taller to fit the status text, disable this option. When using JPT, if you accidentally drag the status window offscreen, you can quickly restore the window to be properly positioned on your main screen by clicking either or both of the “Recenter Window Horizontally” & “Recenter Window Vertically” buttons. The “Verbose Display” option allows you to determine whether JPT displays either the most basic information in the status window when dialing or the robust information including the type of call, Dial Method, and original and transformed number dialed.
If you prefer a more standard Mac OS X-style window for the main interface, enable the option to use the “Alternate Main Window”:
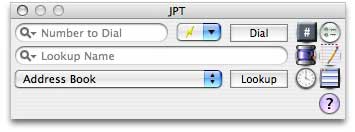
You may position the main JPT window by simply dragging it to your desired position on screen or you can use the more precise positioning arrows or matrix to automatically position it.
For maximum convenience, you may enable the Quick Dial entries and/or the Recently Dialed Numbers menus as separate menus in the menu bar as well as in the main JPT menu. You can also set the number of recently dialed numbers retained and clear the menu immediately.
To quickly show the main window and highlight the search field, you can use the default global hotkey Command-Control-Option-\. This hotkey will work from any application. If it conflicts with another hotkey that you have defined or is defined by another application, you may disable the JPT hotkey (or modify the hotkey used including the modifier keys requited) by disabling the “Use Lookup Hotkey” option. When using the Lookup function, JPT normally hides the contact manager that is searched. If you disable the option to “Hide PIM on Lookup”, JPT will not hide the contact manager (PIM = Personal Information Manager).
When you enter text into the number field and click “Dial”, non-numeric characters are converted to numbers and dialed. If you don't want non-numeric characters converted and dialed, you can disable this option by un-checking the option “Convert Mnemonics in Dial Field”. If you copy text to the clipboard that includes a number and use the feature in JPT to “Dial Number on Clipboard”, the clipboard content will be parsed and the number will be extracted and dialed. Normally, just the numbers will be extracted but if you enable the option to “Include ‘+’ & ‘,’ when Dialing from the Clipboard”, those characters will also be included.
If you enable “Voice Feedback”, JPT will use the Mac’s built-in text-to-speech capabilities to announce certain events such as when a busy signal is received. This is used sparingly so it won’t get too annoying but still, you may want to disable it entirely. To set more voice-related preferences, see the Speech preference pane in the System Preferences.
If you get stuck while using JPT and need a little help, you can always use the online help but sometimes that’s a bit much. For a little lighter help, try turning on the tool tips. If you find them annoying, you can always turn them off later.
By default, JPT runs as a background application that you interact with by means of a menu in the menu bar. When run in this mode, the JPT icon does not appear in the Dock and JPT will not be available when switching between applications using the built-in Mac OS X application switcher (Command-Tab). If you would prefer to be able to switch to JPT using the Dock or the application switcher, you must check the “Show in Dock” option at the bottom of the main interface window. Once this is checked (or un-checked), the application will quit and you will need to relaunch to take advantage of the modification. When you check this box, there is a property written to a .plist file in the JPT bundle.
Please be aware that when run as a background application JPT will also not appear in the Force-Quit list. This setting is system-wide, not just user-specific.
Please note: Your system should automatically recognize this change. If, however, the change is not recognized the next time you launch JPT, you must force your system to recognize the change. To do so, quit JPT, then, in the Finder, move the application icon to the desktop (or some folder other than its current location), then move it back to the original location and launch again.
If you want some extra security that you are really dialing the number you want to dial, you can enable the option to use a confirmation which will present a dialog asking to affirm the dial request. When dialing, JPT can automatically launch an external application or AppleScript. To choose an application or AppleScript to run before dialing, just click the “Launch Application or AppleScript Before Dialing” checkbox and navigate to the application or script you wish to use. If you choose to use an AppleScript, the information about the pending call will be passed to the script. This script should be a regular script with an explicit run handler that includes an argv parameter:
|
on run argv try set {contact_number, contact_name, call_type, dial_method, transformed_number} to argv -- do something here... on error the_error display dialog "Error: " & the_error buttons {"OK"} default button 1 with icon 0 giving up after 20 return false end try return true end run |
When run, JPT will pass the contact number, contact name (if available), the type of call (e.g., local or domestic long distance, etc.) and the number transformed by the current Dialing Rules to the script. You can then use those values in your own script to do whatever you want (build a custom logging application, etc.). Also, if the script returns false, the call will be cancelled. See the example scripts in the “JPT Before Dialing... Scripts” folder in the “Goodies” folder on the JPT disk image for more information.
You can also opt to pause iTunes (or simply adjust the iTunes volume), pause the DVD Player, and change your iChat status message.
Once a call has been successfully dialed, if any of the supported applications’ status has been changed, you may enable the option display a dialog that will wait for you to manually inform JPT that your call has ended. This requires a manual notification because JPT cannot monitor all of the supported Dial Methods to know when a call has terminated. When the call is finished, if this dialog is enabled, you can click the “Continue” button and the supported applications will be restored to their previous state (volume, playing, etc.). If you do no enable this dialog, you may still restore the modified applications settings by clicking the “Restore Now” button or the corresponding menu item in the main JPT menu.
Copyright © 2004 - 2017 JNSoftware LLC. All Rights Reserved.
All other products mentioned are copyright of their respective owners.
No endorsement of or affiliation with any third-party product or service is implied.