Dialectic is all about flexibility. A major part of this is configuring the interface to best meet your needs. You can easily set window positions, use a comprehensive alert system, voice feedback and more. You can even set Dialectic to be a background-only application available discretely from the menubar or as a regular application that can be hidden and activated as necessary.
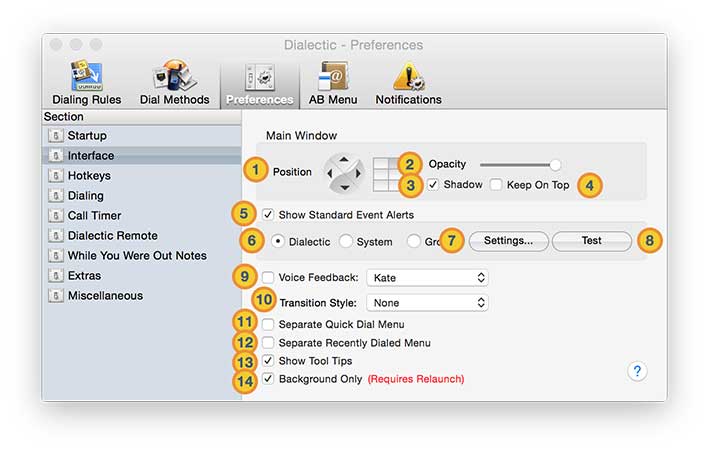
![]() Main Window Position. You can drag the main window where you’d like (and hold the Option key to override the automatic snap-to-edges in order to move the window to a secondary display) or you can precisely position it using the arrow buttons or the grid matrix to quickly situate the window. When using the arrow buttons, the window will move in 1 pixel increments. If you hold down the Option key when clicking on the arrows, the window will move in 10 pixel increments.
Main Window Position. You can drag the main window where you’d like (and hold the Option key to override the automatic snap-to-edges in order to move the window to a secondary display) or you can precisely position it using the arrow buttons or the grid matrix to quickly situate the window. When using the arrow buttons, the window will move in 1 pixel increments. If you hold down the Option key when clicking on the arrows, the window will move in 10 pixel increments.
![]() Main Window Opacity. Adjust the slider to fine tune the opacity (transparency) of the main window.
Main Window Opacity. Adjust the slider to fine tune the opacity (transparency) of the main window.
![]() Main Window Shadow. Use this to toggle the shadow of the main window on & off.
Main Window Shadow. Use this to toggle the shadow of the main window on & off.
![]() Keep On Top. Set this option to keep the main window floating over all other windows.
Keep On Top. Set this option to keep the main window floating over all other windows.
![]() Show Standard Event Alerts. To have Dialectic alert you to standard events (such as dialing), enable this option. Disable it to have Dialectic run unobtrusively as it works.
Show Standard Event Alerts. To have Dialectic alert you to standard events (such as dialing), enable this option. Disable it to have Dialectic run unobtrusively as it works.
![]() Dialectic, System or Growl. If you have enabled the standard event alerts, you can use the Dialectic’s built-in alert system, the OS X notification system, or, if installed, you can use the Growl notification system.
Dialectic, System or Growl. If you have enabled the standard event alerts, you can use the Dialectic’s built-in alert system, the OS X notification system, or, if installed, you can use the Growl notification system.
![]() Dialectic’s Built-In Alert System Settings. Click this button to adjust the properties of the alert windows (see below).
Dialectic’s Built-In Alert System Settings. Click this button to adjust the properties of the alert windows (see below).
![]() Test. Use the test button to generate a test alert using either the built-in alert system or Growl.
Test. Use the test button to generate a test alert using either the built-in alert system or Growl.
![]() Voice Feedback. In addition to textual alert windows, Dialectic can use the system’s text-to-speech functions to speak standard events. If enabled you can also specify the voice used for these alerts.
Voice Feedback. In addition to textual alert windows, Dialectic can use the system’s text-to-speech functions to speak standard events. If enabled you can also specify the voice used for these alerts.
![]() Transition Style. Many views in the preferences window have a transition when moving from one view to another (such as switching preferences sections or Dial Method configurations). You can choose the transition used — or disable them entirely — from this pop-up menu. (This is a bit of visual flair for the application and serves no practical function but it can be make using the application a little more fun.)
Transition Style. Many views in the preferences window have a transition when moving from one view to another (such as switching preferences sections or Dial Method configurations). You can choose the transition used — or disable them entirely — from this pop-up menu. (This is a bit of visual flair for the application and serves no practical function but it can be make using the application a little more fun.)
![]() Separate Quick Dial Menu. The Quick Dial menu is available from a submenu in the main menu and also from an action button in the main window. To have easier access to these numbers, you can enable this option to show this menu as a top-level menu (this varies slightly depending on the Application Mode in use).
Separate Quick Dial Menu. The Quick Dial menu is available from a submenu in the main menu and also from an action button in the main window. To have easier access to these numbers, you can enable this option to show this menu as a top-level menu (this varies slightly depending on the Application Mode in use).
![]() Separate Recently Dialed Menu. The Recently Dialed menu is available from a submenu in the main menu and also from an action button in the main window. To have easier access to these numbers, you can enable this option to show this menu as a top-level menu (this varies slightly depending on the Application Mode in use).
Separate Recently Dialed Menu. The Recently Dialed menu is available from a submenu in the main menu and also from an action button in the main window. To have easier access to these numbers, you can enable this option to show this menu as a top-level menu (this varies slightly depending on the Application Mode in use).
![]() Show Tool Tips. Tool tips can be highly beneficial to explain what buttons and controls do without actually clicking on the controls themselves. Some users find these tool tips to be distracting and, for this reason, they can be disabled.
Show Tool Tips. Tool tips can be highly beneficial to explain what buttons and controls do without actually clicking on the controls themselves. Some users find these tool tips to be distracting and, for this reason, they can be disabled.
![]() Background Only. This option toggles the application mode between background and foreground modes.
Background Only. This option toggles the application mode between background and foreground modes.
Status Window Preferences
If you opt to show standard event alerts and use the built-in alert system, you can configure the alerts in a number of ways including placement and visual style. To do this, click the “Settings...” button.
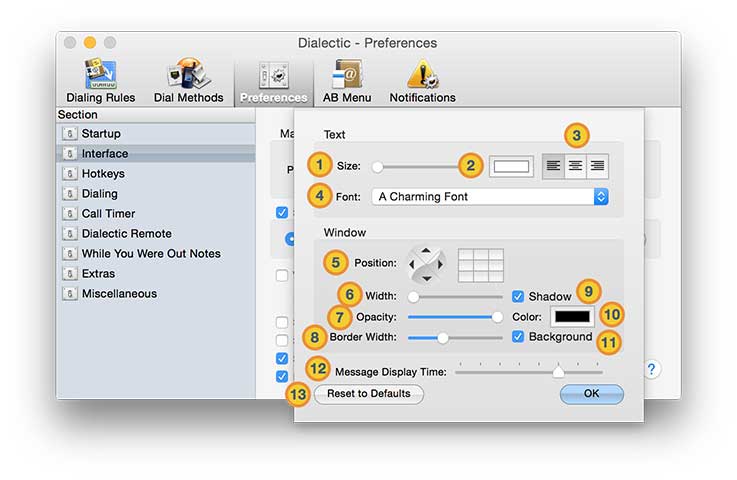
![]() Text Size. Adjust the size of the text using this slider.
Text Size. Adjust the size of the text using this slider.
![]() Text Color. Use the standard color picker to determine the color of the text.
Text Color. Use the standard color picker to determine the color of the text.
![]() Text Alignment. Use this control to set the alignment of the text to left, center, or right.
Text Alignment. Use this control to set the alignment of the text to left, center, or right.
![]() Text Font. Choose a font from this pop-up menu for the text displayed in the alert windows.
Text Font. Choose a font from this pop-up menu for the text displayed in the alert windows.
![]() Status Window Position. Like the main window, you can drag the alert window where you’d like (and hold the Option key to override the automatic snap-to-edges in order to move the window to a secondary display) or you can precisely position it using the arrow buttons or the grid matrix to quickly situate the window. When using the arrow buttons, the window will move in 1 pixel increments. If you hold down the Option key when clicking on the arrows, the window will move in 10 pixel increments.
Status Window Position. Like the main window, you can drag the alert window where you’d like (and hold the Option key to override the automatic snap-to-edges in order to move the window to a secondary display) or you can precisely position it using the arrow buttons or the grid matrix to quickly situate the window. When using the arrow buttons, the window will move in 1 pixel increments. If you hold down the Option key when clicking on the arrows, the window will move in 10 pixel increments.
![]() Status Window Width. Use the slider to adjust the width of the alert window up to the width of the main display.
Status Window Width. Use the slider to adjust the width of the alert window up to the width of the main display.
![]() Status Window Opacity. Adjust the slider to set the alert widow opacity (transparency).
Status Window Opacity. Adjust the slider to set the alert widow opacity (transparency).
![]() Status Window Border Width. You may adjust the width of the border around the alert window or even disable it entirely by moving he slider all the way to the left.
Status Window Border Width. You may adjust the width of the border around the alert window or even disable it entirely by moving he slider all the way to the left.
![]() Status Window Shadow. Use this to toggle the shadow of the alert window on & off.
Status Window Shadow. Use this to toggle the shadow of the alert window on & off. 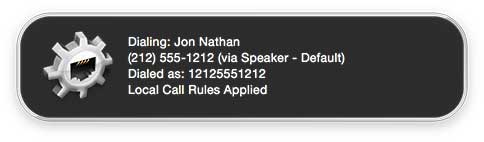
![]() Color. The color of the status window.
Color. The color of the status window.
![]() Status Window Background. To have the text displayed with no background, disable this option.
Status Window Background. To have the text displayed with no background, disable this option.
![]() Message Display Time. Move this control to adjust the time that alert windows are kept on screen before they are automatically dismissed. Move the control to the right for a longer duration and to the left for a shorter duration.
Message Display Time. Move this control to adjust the time that alert windows are kept on screen before they are automatically dismissed. Move the control to the right for a longer duration and to the left for a shorter duration.
![]() Reset to Defaults. Use this to return all of the status window settings back to the original defaults.
Reset to Defaults. Use this to return all of the status window settings back to the original defaults.